Selasa, 28 Juni 2016

Compare HTC Windows Phone 8X vs Nokia Lumia 820

Compare HTC Windows Phone 8X vs Nokia Lumia 820 - For business performance, the two smartphones have equivalent performance. Both are powered by the Qualcomm MSM8960 Snapdragon chip with support for dual-core 1.5GHz processor and GPU Adreno 225 Krait. Both come equipped with 1GB of RAM.

Nokia Lumia 820 and HTC Windows Phone 8X both have a touch screen with the same size of 4.3 inches. But for the quality of the screen HTC Windows Phone 8X better, as this smartphone uses S-LCD2 display with a resolution of 720 x 1280 pixels (342ppi) and coated with Corning Gorilla Glass 2. While the Nokia Lumia 820 uses AMOLED screen with a resolution of 480 x 800 pixels (217ppi) and comes with Nokia ClearBlack technology.
Nokia Lumia 820 vs    HTC Windows Phone 8X

Nokia Lumia 820 and HTC Windows Phone 8X both equipped with an 8 megapixel camera. But for the quality of the photo, Lumia 820 camera seems more promising, because this smartphone uses Carl Zeiss Tessar lens. Both are also equipped with a front camera.

HTC Windows Phone 8X internal memory capacity of 16GB which is larger, but unfortunately this smartphone does not have an external memory slot. The Nokia Lumia 820 only has an internal memory capacity of 8GB, and the smartphone is also equipped with a microSD slot up to 64GB.

For connectivity features both equipped with features such as 3G network support HSDPA / HSUPA, Wi-Fi a / b / g / n, Bluetooth 3.1, GPS, microUSB port, NFC, and even 4G LTE network (4G service is unfortunately not yet can be enjoyed in Indonesia). Both use a micro SIM.

And for power, the Nokia Lumia 820 is equipped with a battery capacity of 1650mAh, and HTC Windows Phone 8X comes with a battery capacity of 1800mAh.

Both devices offer the same performance. For those of you who like to look good screen lebik can choose HTC Windows Phone 8X, and for those of you who want a smartphone with a better quality camera can choose Nokia Lumia 820.

Nokia Lumia 820
Nokia Lumia 820

Nokia Lumia 820 is a Windows Phone 8 smartphone that comes with a screen measuring 4.3-inch AMOLED touchscreen with a resolution of 800 x 480 pixels. Nokia Lumia 820 is powered by a dual-core Snapdragon S4 processor 1.5GHz, Adreno 225 GPU and 1GB of RAM.

Nokia Lumia 820 is equipped with an 8 megapixel camera with Carl Zeiss optics, 8GB internal memory, NFC, HSDPA and HSUPA, Wi-Fi, Bluetooth, GPS, microSD slot up to 32GB, and battery capacity of 1650mAh. Nokia Lumia 820 is also equipped with a wireless charging support (without cables).

HT C Windows Phone 8X
HTC Windows Phone 8X

HTC Windows Phone 8X present using WIndows Phone 8 OS with support for dual-core processor 1.5GHz Snapdragon S4 Krait, and comes with Adreno 225 GPU and 1GB of RAM. HTC Windows Phone 8X using the touch screen Super sized 4.3-inch LCD 2 with 720p resolution and is coated with Corning Gorilla Glass 2.

HTC Windows Phone 8X comes with an 8 megapixel camera that uses HTC ImageChip, where the smartphones camera is capable of recording 1080p HD video with stereo sound. HTC Windows Phone 8X also equipped with 2.1 megapixel front camera, 16GB o f internal memory plus a microSD slot, Wi-Fi a / b / g / n, Bluetooth, GPS, NFC, 1800mAh battery, and Beats Audio.

Compare Samsung Galaxy Y Duos vs Acer Z110


Samsung Galaxy Y Duos vs Acer Z110 - Acer Z110 and Samsung Galaxy Y Duos are both present but using different versions of the Android OS. Acer Android 4.0 ICS Z110 uses a newer, while the Samsung Galaxy Y Duos still using Android 2.3 Gingerbread.

For business performance, Acer Z110 is powered by a single core 1GHz processor and 512MB of RAM. While the Samsung Galaxy Y Duos ditenagi with single-core 832MHz processor and 290MB of RAM. Acer Z110 also has an internal memory capacity of a much larger that 4GB, while the Samsung Galaxy Y duos only has 160MB of internal memory capacity.
Acer Z110 has a size large r touch screen that measures 3.5 inches with a resolution of 320 x 480 pixels (165ppi). While the Samsung Galaxy Y Duos has a 3:14-inch touchscreen with a resolution of 240 x 320 pixels (127ppi).

Acer Z110 and Samsung Galaxy Y Duos are both equipped with a 3 megapixel camera. And they are not equipped with a front camera.

For connectivity features, these two smartphones equipped with 3G HSDPA, WiFi, Bluetooth, GPS, and microUSB port.

I prefer Acer Z110, in addition to having a cheaper price tag, Acer Android version Z110 offers a newer, faster performance, larger screen, and a larger internal memory.

Acer Z110
Acer Z110 is a smartphone Android 4.0 ICS that comes with touch screen measuring 3.5-inch 320 x 480 pixels. Acer Z110 is powered by a 1GHz processor.

Acer Z110 comes with 4GB of internal memory plus a microSD slot, 512MB RAM, 3 megapixel camera, WiFi, GPS, Bluetooth, and 3G support HSDPA / HSUPA.

Samsung Galaxy Y Duos
Samsung Galaxy Y Duos is an Android smartphone to support dual GSM + GSM. Samsung Galaxy Y Duos present uses Android 2.3 Gingerbread with 830MHz processor support.

Samsung Galaxy Y Duos comes with other features such as a touch screen measuring 14.3 inches with a resolution of 240 x 320 pixels, 512MB ROM, 384MB RAM, 3 megapixel camera, HSDPA support, Wi-Fi 802.11 b / g / n, Bluetooth 3.0, GPS, microSD slot up to 32GB, and battery capacity of 1300mAh.

Senin, 27 Juni 2016

How to flash Huawei U8800 Stock ROM


How to flash Huawei U8800 Stock ROM without any tools


Method 1:


Step 1: Download stock ROM from below link.

Step 2: Extract ROM on your PC or mobile. After extracting you will see UPDATE.APP  file.

Step 3: Now, cre ate New folder on your Micro SD card, and rename it to dload.

Step 4: Now, Move UPDATE.APP file to dload folder.

Step 5: Now, power OFF your phone.

Step 6: Now press Power key + Volume down + volume up for 5-10 seconds.


Step 7: Now you will see update process on your phone like below image.


Step 8: Once update process completed, your phone will automatically restart.


Method 2:


Step 1: Download stock ROM from below link.

Step 2: Extract ROM on your PC or mobile. After extracting you will see UPDATE.APP  file.

Step 3: Now, create New folder on your Micro SD card, and rename it to dload.

Step 4: Now, Move UPDATE.APP file to dload folder.

< Step 5: Now, navigate to Settings > Updates > System Updates> Local Update


Step 6:  Now, read all the warning and tap CONFIRM to start update process.

Step 7:   Once update process completed, your phone will automatically restart.


< DOWNLOAD:


Guide to Install CWM and TWRP Recovery on Android Smartphone Without PC

Guide to Install CWM and TWRP Recovery on Android Smartphone Without PC.

Install CWM and TWRP Recovery. On this guide we will learn together how to install a recovery on any android device. You can find a lot of custom recoveries available and ready to install on android device, but today most popular recovery are ClockworkMod Recovery (also called CWM) and TWRP (TeamWin Recovery Project). There are three methode you can use as a standart methodes to install custom recovery on your Android smartphone devices. First, we can use ROM Manager or GooManager. second, we can use Fastboot. third, using flash image. You can decide which the easiest method to install custom recovery on your device.


Before we go to t he next step, we must know what is the different of CWM and TWRP recovery. So, you can easy to decide what recovery should be used when you want to flash or install ROM on your device. CWM or ClockworkMod Recovery has been developed by Koushik Dutta (Koush), By using CWM recovery you will be able to perform several advanced recovery, installation, maintanance system, backup and restoration on your Android device which this is not possible you did on the stock recovery. And sometimes its most common method used to gain root access to your android system, install custom ROMs, Install new kernel, install themes and mods.

And now, what is TWRP (TeamWin Recovery Project) definitions ? This recovery is a fully touch-based custom recovery that was initially developed for Nexus devices, But now TWRP recovery has been made avail able for countless other android smartphones and tablets as well, and its avaliable in official or third party.

On this guide We will show to you step by step guide to install CWM and TWRP Recovery on Android Smartphone Without PC. You can follow guide below to install it on your Android device.

Guide to Install CWM and TWRP Recovery.

  1. Your android device should on WiFi area coverage.
  2. Make sure your android device has been rooted.
  3. You must download and install ROM Manager Apps

    • For free use download here

    • For premium use download here
  4. Then open this App, on main screen you will see recovery setup.
    Install CWM and TWRP Recovery
    Install CWM and TWRP Recovery
  5. Under Install update recovery, you can select which custom recovery want to be installed on android device. There are two option on it.
    • ClockworkMod Recovery (CWM)
    • Team Win Recovery Project (TWRP).
  6. When you finished select the custom recovery, now confirm your phone model. 
    confirm your phone model.
    confirm your phone model.
  7. Here is list of device supported by this apps is : 

    • Huawei
      • Huawei Pulse Mini
      • Huawei Pulse 
      • Huawei Ascend
      • Huawei U8220/U8230
      • Huawei Ascend 2 (M865)
    • Dell
      • Dell Streak
    • Commtiva
      • Commtiva Z71 (Boston, Blaze, and more)
      • Commtiva Link N700, 
      • Commtiva Spice MI700
    • Geeksphone
      • Geeksp hone ONE
    • Micromax
      • Micromax A70
    • Samsung
      • Samsung Galaxy S2 (T-Mobile)
      • Samsung Galaxy Tab 8.9 (AT&T)
      • Samsung Galaxy S Blaze 4G
    • LG
      • LG Connect 4G MS840
      • LG Lucid VS840
      • LG Spectrum 4G
      • LG Revolution 4G
      • LG Esteeem 4G
      • LG Optimus M+
  8. If your device not listed above, you should abort this task.
  9. After you confirm phone model, now confirm version of your custom recovery
    • ClockworkMod 2.x
    • ClockworkMod 3.x+
  10. Then download your custom recovery
  11. When finish you must reboot your android device.

  12. If you successfully installed custom recovery, you will see recovery already installed on your android system.
    Install CWM and TWRP Recovery
    Install CWM and TWRP Recovery 
  13. Finish, your android device is installed custom recovery now.

How to Transfer Data Contacts from Android to LG G5


If you plan to switch from Android to LG G5, you may want to transfer Android Data contacts to LG G5. Android Contacts Transfer is the best tool to help you transfer data from Android Samsung/LG/HTC/Sony/Huawei/Moto to LG G5 directly on computer. All your contacts will be copied and merged perfectly on your LG G5. Convenient and safe.

Mobile Transfer is an easy-to-use phone to phone transfer software for Android, Android and LG users to transfer contacts, photos, music, videos, messages, call history, apps and more b etween two phones, e.g. transferring Contacts from android to LG G5, transferring apps from old Android to new LG, transferring music from iPhone to Android, etc. with only 1 click.


Easy use guide to transfer data contacts from android to LG G5:


Step 1. Run the Transfer Tool

Launch Mobile Transfer on your computer after its installed. When you get the primary window as below, please select the Phone to Phone Transfer mode.


Step 2. Connect Both Android Devices to PC

Connect both your old android and new LG G5 phones to the computer via their USB cables respectively. Once the software recognizes both devices, they will be displayed on the window with one being the Source and the other, the Destination.
Note: The "Flip" button is used to switch two phones places when necessary.


Step 3. Transfer contacts from Android to LG G5

You cant miss the middle column where you can choose data to copy. Please check "contacts" and click "Start Copy". When the contacts transferring is done, please click OK.


----------------------------------------------------------------------------------------------------------------------------------


More related articles

How to Transfer Contacts from Samsung Galaxy S3/S4/S5 to iPhone 5SE

How to Transfer iPhone Contacts to Samsung S7 (Edge)

How to Transfer Data Between Samsung Galaxy And LG G4 Pro

How to Transfer Data Contacts from Samsung to LG V10?

HTC Evo 4G LTE user manual for Sprint


HTC Evo 4G LTE user manual for Sprint â€" HTC Evo 4G LTE was released on May 2012 exclusive for Sprint Nextel carrier. HTC Evo 4G LTE released by the Taiwanese manufacturer as a successor of the old Evo series, HTC Evo 4G and HTC Evo 3D. With good appearance and smart features, HTC Evo 4G LTE is the first LTE enabled smartphone for Sprint will make Sprint subscribers will enjoy the smartphone.


HTC Evo 4G LTE user manual for Sprint


HTC Evo 4G LTE for Sprint Nextel equipped with specifications and key features such as: 134.8 x 68.9 x 8.9 mm in dimension with 134 g in weight, 4.7 inch Super IPS LCD 2 capacitive touchscreen display 16 million colors 720 x 1280 pixels plus Corning Gorilla Glass protection and HTC Sense UI 4, microSD up to 32 GB, 16 GB of storage, 1 GB of RAM, 8 megapixel rear facing camera with autofocus and LED flash, 1.3 megapixel front facing camera, Android 4.0.3 Ice Cream Sandwich operating system, powered by 1.5 GHz dual core MSM8960 Snapdragon Adreno 225, Li-Ion 200 mAH battery, stand-by time up to hours and talk time up to 7 hours.

< span style="font-family: Arial, sans-serif; font-size: 9pt; font-weight: normal;">HTC Evo 4G LTE user manual for Sprint is available to download in pdf format which will helps Sprint users on safety to use the smartphone. The user manual guide of HTC Evo 4G LTE contains of 208 pages with 3.32 MB of size. On HTC Evo 4G LTE user manual you will find setting up of some apps such as: Sprint TV & Movie and Nascar Sprint Cup Mobile.

Table of contents for HTC Evo 4G LTE user manual for Sprint:

  • Get started
  • Phone basics
  • Phone calls
  • Settings
  • People
  • Accounts and messaging
  • Applications and entertainment
  • Web and data
  • Camera and video
  • Tools and calendar
  • Calculator
  • Clock and a larm
  • Stocks
  • Weather
  • Tasks
  • Online storage
  • HTC Sync Manager
  • Voice recorder
  • Bluetooth and NFC
  • MicroSD card
  • Upd ate your phone
  • Index

For owners of HTC Evo 4G LTE, here we give you direct link download of HTC Evo 4G LTE user manual for Sprint from official of HTC website below:

Download HTC Evo 4G LTE user manual for Sprint here 


Minggu, 26 Juni 2016

Android Tablet Data Recovery How to Recover Deleted Files from Android Tablet

Tablet is a great tool to take photos, watch videos, listen musics, and capture amazing moments, it become a necessary device in our daily life. More and more people are tend to use android tablet due to the open-source nature of Google’s Android OS. In the meantime, more and more android tablet users encountered data loss and came to us for help. That’s why we post this article to solve this issue, read on to get the detailed way to recover deleted files from Android tablets.

Before we get started, I’d like to introduce a powerful android tablet data recovery tool named Jihosoft Android Data Recovery(Android Recovery Mac). This program is the key to restore data from Android tablet, with it, you can easily get back deleted/lost files on android internal memory as well as external sd card of your tablet.


About Android Tablet Recovery:

Supported Android Tablets: Samsung tablets like Samsung Galaxy Note 10.1, Galaxy Tab2 10.1, Galaxy Tab2 7.0, Galaxy Tab Plus, Galaxy Tab 7.7, Galaxy Tab 7.0 Plus. Galaxy Tab Pro, Galaxy Tab S, Galaxy Tab A, Galaxy Tab S2, Galaxy Tab 4 Galaxy Note, etc. Nexus 10, Google Nexus 9, Nvidia Shield Tablet, Sony-Xperia-Tablet etc.

Supported File Types:
photos, videos, contacts, important messages (like viber messages, WhatsApp chat history, attachments) documents, etc.

Supported Android OS: Android 5.0 Lollipop, Android 4.4 KitKat, Android 4.1/4.2/4.3 Jelly Bean, Android 4.0 Ice Cream Sandwich and Android 3.0/3.1/3.2 etc.

How to Use Android Tablet Recovery Program to Recover Data


Ste p 1. Turn off Wifi/3G connection and stop use your tablet. This step is very important, as deleted/lost data on android tablet probably overwritten by new content.
Step 2. Plug your android tablet to computer. Keep the tablet connected with your computer(mac) until the recovery process done.
Step 3. Select specified file types you need to recover. Select Multimedia option to recover photos, videos, audio files and other documents. Choose “Database” to retrieve messages, contacts, “Whatsapp” to recover whatsapp messages and whatsapp attachments. Or you can simply click “All” to scan all data on your tablet.
Step 4. Access and scan data on Android tablet. If you need to recover data from android tablet memory, you have to root your android device at first. Or you can simply enable USB debugging to let this program access to your tablet.
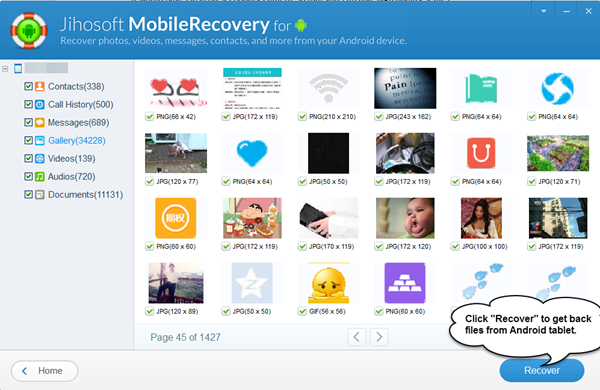
Step 5. Preview and recover data from android tablet selectively. All recovera ble data found will be displayed on the scanning result. Click them one by one to preview, and mark the files you need to restore, then tap “Recover” button. That’s it, you can export the files to your computer/mac in the original quality.