Kamis, 30 Juni 2016

How Hard Reset ZTE Blade S6

How Hard Reset ZTE Blade S6.


Hard Reset ZTE Blade S6. Now We will explain to you how to perform hard reset on ZTE Blade S6 smartphone. Some People say that Hard reset process is call with master reset or factory reset. Many people asking why shoud we perform hard reset to our phone. The logical answer that can I say for this asking is :
  • Because we will sell our ZTE Blade S6 Android phones
  • We will give our ZTE Blade S6 away to some one else, and we dont want that one know everything about our secret data, so we have to erase all data before back up it.
  • our ZTE Blade S6 has been lagging and stuck on android logo, this call with bootloop
  • There are many bug on ZTE Blade S6.
  • We want to remove all personal data and setting that was stored in ZTE Blade S6.device.
  • We have forgotten on PIN or Patern Lock at ZTE Bla de S6.
  • and many other reason.

Hard Reset ZTE BLADE S6 use Hardware Key.

  1. Turn Off your ZTE Blade S6 Handheld first
  2. Open back cover of your ZTE Blade S6, then remo ve battery from this device, wait for 1 minutes to install again on device.
  3. Make sure your battery is fully charged, we recomended taht your battery has 80% power
  4. Always BackUp your important data that store in ZTE Blade S6
  5. Press and hold Volume UP  + Power Button together,

  6. Then, You should release held keys when  your ZTE Blade S6 vibrate and show logo like this picture.
  7. Then recovery Menu appears on the sccreen, like this picture.
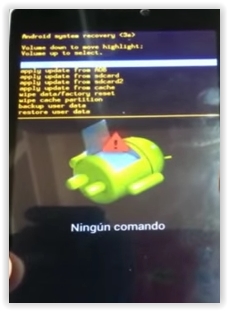
  8. Select option on the recovery menu by pressing Volume Down, you can select english. excecute it by press Power Button.

  9. Then on the main menu select Wipe and reset. select it using volume down, again excecute it by press Power Button.
    < /div>
  10. In the Wipe and Reset  menu. Press Volume Down to scroll to option and select wipe all data.
  11. then confirm it by select yes.
  12. Wait process untill process finish.
  13. Then press Power Button, to confirm menu and then choose  reboot system now.


Thats all, you have done to Hard Reset ZTE Blade S6,

ATTENTION... !!!
Hard Reset/Master reset/Factory Reset may erase all data stored on internal memory and all accoount setting, We  is not responsible for the risks afterward. 
Do it with your own risk

Canon PowerShot G15 digital camera user manual guide

Canon PowerShot G15 digital camera user manual guide â€" Canon PowerShot G15 is digital compact camera G series and updated version of Canon PowerShot G1. Canon PoweShot G15 with specifications and key features will gives photographers a lot plenty and capabilities with advanced 12-bit multi aspect RAW+JPEG.  Other features that Canon PowerShot G15 offers are high speed AF and speedlite flashes.


Canon PowerShot G15 digital camera user manual guide


Canon PowerShot G15 digital camera equipped with specifications and key features such as: 106.6 x 75.9 x 40.1mm with 352 g in weight, 12.1 megapixel resolutions, CMOS optical sensor, 5x optical zoom, 4x Digital and 20x Combined Zoom with Optical Image Stabilizer, real image zoom viewfinder, 3.0-inch TFT Color LCD with wide viewing angle.

Canon PowerShot G15 digital camera user manual guide is available to download in pdf file format with 16.82 MB size and contains of 316 pages. Canon PowerShot G15 digital camera user manual guide will help owner with explanation about features and functions of the device.

Table of contents for Canon PowerShot G15 digital camera user manual guide:
  • Basic guide
  • Advanced guide
  • Smart auto mode
  • Other shooting modes
  • P mode
  • TV, AV, M, C1 and C2 mode
  • Playback mode
  • Setting menu
  • Accessories
  • Appendix
For owner of Canon PowerShot G15, here we give you direct link download of Canon PowerShot G15 digital camera user manual guide from official Canon website below:

Download Canon PowerShot G15 digital camera user manual guide here

Top 3 Reasons Why People Use Tracfone

3 Reasons Why People Like Using Tracfone

A lot of people use Tracfone for a lot of different reasons. But what are the top three reasons why consumers use Tracfone, making it one of the fastest growing cell phone companies in America?

Many tech-savvy gadget heavy Americans wonder why anyone would want a prepaid cell phone with basic features and limited minutes. But apparently, there are a lot of consumers who are looking for just that, because of several key reasons. Below are the top three, with the biggest reason at the end.

3. Ease of Use

While the phones from Tracfone are not always simple and intuitive to use, it is very simple to buy a Tracfone, activate it and add minutes. In just an hour or two anyone can have a mobile phone with no further monetary obligations.

Although contract phones dont take very long to set up either, they do require a bit more ink.

Thus many people are choosing a p repaid carrier such as Tracfone, simply because it is easy to deal with, and there are no strings attached as far as keeping up with payments or upgrades.

2. Convenience 

Along the same lines of ease of use, Tracfones and other prepaid mobile phones tend to be very convenient in that when you need them, you can add minutes and they are ready to use. If you dont need it for a few months, then no need to waste money on it, you can just not buy any minutes for it.

This convenience of choosing when you want to have a cell phone is another significant reason for consumers picking Tracfone. However, the biggest reason is next.

1. Cost

By a large margin, consumers choose no contract prepaid cell phones like the ones from Tracfone because of the low cost and no fees.

With Tracfone, a family of four can each have a cell phone with minutes and service, for $30 a month with the Tracfone Family Value Plan (read o ur review of it to learn more!). Yes, that is $30 total, per month, or less than $1 a day for 4 phones!

Along with low cost minutes and service bundles, Tracfone also keeps the cost of phones very low, typically under $60 for their best phones like the LG 840G or Samsung S390G

What about people who need to use their phone a lot for talking or texting? Plenty of prepaid cell phone companies (but not Tracfone) offer monthly unlimited plans for less than what the major contract companies offer.

In a time when economic conditions have made many people more money-conscious, the low cost of prepaid cell phones is getting noticed.

Many people choose Tracfone for a variety of other reasons as well, perhaps as a back up or emergency phone, or just for a short time while they look into other mobile phone options.

So why do you use Tracfone? Leave a comment with your top 3 reasons for using Tracfone.

LG G Pad 8 3 user guide manual

LG G Pad 8.3 user guide manual â€" LG G Pad 8.3 or also known as LG G Pad 8.3 V500 was announced on September 2013 with 8.3 inches screen display and integrated with multimedia room setup with IR port and QRemote. The LG G Pad 8.3 tablet is offer compatibility to users for browsing or reading.  LG G Pad 8.3 tablet carry 5 megapixel as the main camera with autofocus, LED flash, image stabilization, time catch shot and VR panorama features.


LG G Pad 8.3 user guide manual


LG G Pad 8.3 equipped with specifications and key features such as: 216.8 x 126.5 x 8.3 mm (8.54 x 4.98 x 0.33 inches) in dimension with 338 g (11.92 oz) for weight, 8.3 inches capacitive touchscreen display 16 million colors 1200 x 1920 pixels screen display with multitouch support, microSD up to 64 GB, 16 GB internal storage, 2 GB of RAM, stereo speakers, 5 megapixel rear facing camera with autofocus and LED flash, 1.3 megapixel front facing camera, run Android 4.2.2 Jelly Bean operating system, powered by 1.7 quad core Qualcomm APQ8064 Pro Snapdragon 600 processor Adreno 320 and Li-Ion 4600 mAH battery non removable.

LG G Pad 8.3 user guide manual available to download in pdf file format with 9.016 MB size and contains of 134 pages. The manual PDF of LG G Pad 8.3 explain about the Tools equipments such as: Qpair, Qslide, Quick Memo, Quick Remote, Quick Translator, Voice Mate, POLARIS Office 5 and others.

Table of contents for LG G Pad 8.3 user guide manual:
    < li>About This User Guide
  • Important Notice
  • Getting To Know Your Devices
  • Your Home Screen
  • Google Accounts Setup
  • Connecting To Networks And Devices
  • Contacts
  • Email
  • Camera
  • Video Camera
  • Multimedia
  • Tools
  • The Web
  • Settings
  • LG Backup
  • Tablet Software Update
  • Accessories
  • Troubl eshooting
  • For Your Safety

Download LG G Pad 8.3 user guide manual here

Rabu, 29 Juni 2016

Cara Hard Reset LG Spirit 4G MS870 99 Work

Cara Hard Reset LG Spirit 4G MS870 [99% Work]


Hard Reset LG Spirit 4G MS870. Terdapat beberapa hal yang perlu anda ketahui sebelum memutuskan untuk membeli perangkat Smartphone baru, silahkan coba prosedur berikut untuk memperbaiki perangkat Anda. Pertama, bagaimana cara mengisi baterai Anda, backup data penting Anda, bagaimana cara mengambil SIM card dan kartu SD sebelum melakukan factory reset. Memang sangat tidak mungkin untuk memulihkan data Anda setelah melakukan hard reset, sehingga melakukan backup online sangat penting. Untuk semua data Anda, backup harus dilakukan pada perangkat eksternal, hard drive, dll. Dengan atau tanpa asuransi, jika ponsel Anda hilang, rusak atau dicuri setidaknya data yang berharga Anda didukung di tempat yang aman. Jika Anda akan menjual ponsel Anda dan Anda ingin menghapus data pribadi Anda, atau jika ponsel Anda terkena virus yang harus Anda lakukan adlah melakukan hard reset. Dalam beberapa kasus, Anda dapat me nghapus password yang terlupakan atau pola kunci dari perangkat Anda juga. Semua informasi adalah untuk perangkat dengan ROM berbasis Stock. Jika Anda menggunakan perangkat yang sudah di root, selalu back up folder EFS Anda terlebih dahulu, yang berisi informasi IMEI, dll!

Nah, sekarang kita mencoba untuk bereksperimen dengan melakukan Hard Reset pada perangkat LG Spirit 4G MS870, Hal ini kita lakukan tentunya jika terjadi maslah seperti yang dijelaskan diatas, Tetapi jika anda belum mengenal lebih jauh tentang LG Spirit 4G MS870, sebelum melakukan hard reset alangkah lebih bijak jika anda mengetahui spesifikasi dan kekurangan serta kelemahan smartphone tersebut.
Hard Reset LG Spirit 4G MS870

Spesifikasi LG Spirit 4G MS870

Tahun Pembuatan : 2015

Network

GSM 850 / 900 / 1800 / 1900, HSDPA, LTE

Layar

Tipe : Capacitive touchscreen, 16M colors
Ukuran : 720 x 1280 pixels, 5.0 inches (~294 ppi pixel density)

Dimensi

Ukuran/Berat : 151.3 x 77.2 x 7.3 mm

Audio

Fitur : LCD capacitive touchscreen, 16M colors
Jack :3.5mm jack
Speakerphone :Ya

Memory

Internal : 8 GB, 1 GB RAM
Eksternal ; microSD, up to 32 GB

Data

3G : TD-SCDMA, TD-LTE
EDGE : Ya
GPRS : Ya
WLAN : Ya
Bluetooth : Ya
USB/Port : microUSB v2.0

Kamera

Primer : 5 MP / 8 MP, autofocus, LED flash, Geo-tagging
Sekunder :1MP
Video Record : Ya

Baterai

Tipe : Li-Ion 2100 mAh battery

Fitur

OS : Android OS, v5.0.x (Lollipop)
CPU : Quad-core 1.2 GHz Cortex-A53, GPU Adreno 306
Browser : HTML5
GPS : A-GPS
Messaging : SMS (threaded view), MMS, Email, IM, Push Email
Fitur Tambahan : Java MIDP emulator, Player, Photo/video editor , Document v iewer

Fitur Lain

Video Player : MP4/H.264 player
MP3 Player : MP3/WAV/eAAC+ player
Audio Record : Ya

Kelebihan LG Spirit 4G MS870

  1. Sudah support pada jaringan 4G
  2. Ditanamkan prosesor Quad Core 2,5 Ghz Krait 400, untuk mendukung kinerja optimal anda dalam menggunakan smartphone tersebut.
  3. Dengan Kamera belakang 13 MB, bidik moment indah anda dengan hasil yang terbaik.
  4. 2.1 MP untuk kamera depan, sudah lebih dari cukup untuk melakukan video call dengan hasil yang jernih.
  5. Dijejali dengan RAM 2/3 GB,
  6. Untuk kualitas suara didukung Dolby Mobile Sounds Enhancements
  7. Jaminan screen tetap awet didukung oleh Corning Gorilla Glass 3
  8. Resolusi yang sangat tajam, tapi tidak setajam silet, yaitu 1440 x 2560 pixels
  9. Layar yang gede, bikin asyik untuk mainin video atau lihat gambar, yaitu 5,5 Inch
  10. Dengan type layar depan True HD-IPS + LCD Capacitive Touch Screen.
  11. Battery juga ciamik long live 3000 mAh

Kekurangan LG Spirit 4G MS870

  • Mohon maaf data belum bisa kami tampilkan, berhubung belum bisa menemukan kekuranganya. he .. he :)

Hard Reset LG Spirit 4G MS870 Menggunakan Menu

  1. Buka Android Settings
  2. Tap Backup & reset
  3. Tap Personal Data
  4. Tap Factory Data Reset

Hard Reset LG G3 D851 Menggunakan Kombinasi Tombol

Untuk melakukan hard reset menggunakan kombinasi tombol pada LG G3, caranya adalah sebagai berikut ;
  1. Matikan (Turn Off) Smartphone LG G3 anda.
  2. Tekan dan tahan Tombol Power(Tombol Kunci) + Tombol Volume Down.
    Hard Reset LG Spirit 4G MS870
    Hard Reset LG S pirit 4G MS870

  3. Lepaskan semua tombol ketika muncul logo LG
  4. Kemudian secepatnya anda tekan Tombol power + Tombol Volume Down kembali
  5. Lepaskan semua tombol, ketika muncul layar Factory Data Reset
  6. Tekan tombol Power untuk memilih Yes, atau tekan tombol volume untuk memilih No (Exit) atau membatalkan langkah anda.
    Hard Reset LG Spirit 4G MS870
    Hard Reset LG Spirit 4G MS870
  7. Tekan tombol Power sekali lagi untuk melanjutkan, atau tekan tombol volume untuk membatalkan langkah anda.

    Soft Reset LG Spirit 4G MS870.

    Ketika layar pada LG Spirit 4G MS870 anda menjadi freeze atau not responding, sehingga anda tidak dapat melakukan apa-apa pada smartphone tersebut, langkah yang dapat anda lakukan adalah dengan melakukan soft reset. sehingga LG Spirit 4G MS870 anda akan kembali hidup seperti habis restart, caranya adalah :
    • Tekan dan tahan tombol power (kurang lebih 5 -10 Detik), maka LG Spirit 4G MS870 akan Off dengan sendirinya.
    • Atau, anda da pat melepas baterai yang ada di dalamnya.
    Ok. itu beberapa hal yang dapat anda lakukan untuk HArd Reset LG Spirit 4G MS870 anda, selamat mencoba semoga bermanfaat.

    Acer Liquid E3 user guide manual

    Acer Liquid E3 user guide manual â€" Acer Liquid E3 has announced at CES 2014 with front LED camera flash and claimed that Acer Liquid E3 display have good image quality, better viewing angles and well for the brightness by Manufacturer. Acer Liquid E3 is mid-range smartphone with 4.7 inches of IPS LCD screen display pack, design with plastic at the back and carry 13 megapixel rear facing camera. Acer Liquid E3 or also known as Liquid E3 E380 software support by 1.2 GHz processor also use Mediatek MT6589 fo chipset.


    Acer Liquid E3 user guide manual


    Acer Liquid E3 equipped with specifications and key features such as: 136 x 68 x 9 mm (5.35 x 2.68 x 0.35 inches) in dimension with 134 g (4.73 oz) in weight, 4.7 inches IPS LCD capacitive touchscreen display 16 million colors 720 x 1280 pixels screen display with multitouch, microSD up to 32 GB, 4 GB internal storage, 1 GB of RAM, 13 megapixel rear facing camera with autofocus and LED flash, 2 megapi xel front facing camera, run Android 4.4.2 Jelly Bean operating system and powered by 1.2 GHz quad core Mediatek MT6589 processor.   

    Acer Liquid E3 rivals and competitors manual:
    • Acer Liquid E2
    • Acer Liquid Z3
    • Acer Liquid Z5
    • Motorola Moto G
    • Sony Xperia C
    Acer Liquid E3 pdf manual available to download in pdf file format with 8.6 MB size and contains of 58 pages. Acer Liquid E3 user guide manual will help users, owners and buyers with important information you need about the smartphone including key features, add functions, settings and some solution for troubleshooting.

    Table of contents for Acer Liquid E3 user guide manual:
    • Setting up
    • Using your smartphone
    • Managing contacts
    • Making calls
    • Messaging
    • Going online
    • Using the camera
    • Advanced settings
    • Accessories and tips
    • Appendix
    • End user license agreement
    Download Acer Liquid E3 user manual here

    Apple iPhone 5s Secret Codes New Apple iPhone 5S Hidden Code


    iPhone is the most popular mobile phone in the whole world among peoples of all category as it satisfy needs for all generations. It can be used as a multimedia device, office gadget, gaming console etc.


    Here I am giving you some secret codes of iPhone 5S which will help you to troubleshoot some problems or just to check functionality of you mobile.

                                                                                              
    Here are secret codes for all models of Apple iPhone

    1. *3001#12345#* and tap Call. 
    Enter Field Mode. Field mode contains lots of iPhone inner settings, especially newest network and cell information.

    2. *#06# 
    Shows your IMEI. No need to tap Call. IMEI is the unique identifier for your mobile phone hardware.

    3. *777# and tap Call. 
    Account balance for prepaid iPhone only.

    4. *225# and tap Call. 
    Bill Balance. ( Postpaid only )

    5. *646# and tap Call. 
    Check minutes ( Postpaid only ).

    6. *#21# and tap Call. 
    Set interrogation for call forwards. Discover the settings for your call forwarding.
    You’ll see whether you have voice, data, fax, SMS, sync, async, packet access, and pad access call forwarding enabled or disabled.

    7. *#30# + tap Call. 
    Check the calling line presentation. This shows whether you have enabled or disabled the presentation of the calling line, presumably the number of the party placing the call.

    8. *#76# and tap Call. 
    Check whether the connected line presentation is enabled or not. State whether the connected line presentation is enabled or disabled. Similar to the calling line presentation.

    9. *#43# and tap Call. 
    Determine if call waiting is enabled. Shows call waiting status for voice, data, fax, SMS, sync data, async data, packet access and pad access. Each item is either enabled or disabled.

    10. *#61# and tap Call. 
    Check the number for unanswered calls. Show the number for voice call forwarding when a call is unanswered. Also show the options for data, fax, SMS, sync, async, packet access and pad access.

    11. *#62# and tap Call. 
    Check the number for call forwarding if no service is available. Just like the previous, except for no-service rather than no-answer situations.

    12. *#67# and tap Call. 
    Check the number for call forwarding when the iPhone is busy. And again, but for when the iPhone is busy.

    13. *#33# and tap Call. 
    Check for call control bars. Check all the usual suspects ( voice, data, fax,SMS, etc ) to see whether barring is enabled or disabled for outgoing.

    Click Here to get best applications for iPhone


    Nexus 10 Tablet Pictures Leaked on the Internet

    Nexus Tablet 10 Pictures Leaked on the Internet - Do you still remember the rumors about Googles latest Android tablet, named Nexus 10? This rumor seems to be reinforced by the presence of the image will this tablet. One source is the Brief Mobile brings a tablet which believed that the Nexus 10 tablet and display photo is the first look for this tablet. Photo Nexus 10 tablet present in websiter is not just a picture are displayed, but some photos were published, and it is convinced that the tablet Nexus 10 will become a reality and there is a true rumor.

    Shown in the photos appear to confirm that it was finally known by Google will work with Samsung to produce tablet. The specifications for this tablet include measures will have a 10.1-inch screen with a resolution of 2560 x 1600 pixels, powered by the Exyn os processor 5 which has a speed of 1.7 GHz and 2 GB RAM Amounting. But while these photos are likely to be true is a Nexus 10 tablet device but from the Google and Samsung has not provided any official information of the presence of the photographs to the table Nexus 10. Yet clearly the photos present on the internet is whether only a prototype or are already in the final stage, we wait for official information and announcements from the Google and the Samsung.?
    Nexus 10 Tablet 

    Selasa, 28 Juni 2016

    Lenovo IdeaTab A2107 user manual guide


    Lenovo IdeaTab A2107 user manual guide â€" Lenovo IdeaTab A2107 was released on January 2013 and comes 7 inch tablet with unusual features 8 GB of memory alongside with 3G modem for internet. The Lenovo IdeaTab A2107 performed with some advantages such as: cheap price, expandable storage and dual SIM card slot.


    Lenovo IdeaTab A2107 user manual guide


    Lenovo IdeaTab A2107 equipped with specifications and features such as: 195.1 x 125 x 11.9 mm in dimension, 7 inch TFT capacitive touchscreen 16 million colors 600 x 1024 pixels display. microSD up to 32 GB, 3.15 megapixel rear facing camera, VGA front facing camera, Android 4.0.3 Ice Cream Sandwich, powered by 1 GHz cortex A-9 MTK 6575, Li-Ion 3550 mAH battery, standby time up to 400 hours and talk time up to 7 hours.

    Lenovo IdeaTab A2107 user manual guide will helps owners of the tablet with introduction, knowledge and tips such manual unlock or screen unlock tutorial. The user manual guide of Lenovo IdeaTab A2107 will guide owners with images and steps on how to safe and secure when operating the tablet.

    Table of contents for Lenovo IdeaTab A2107 us er manual guide:

    • IdeaTab appearance
    • Buttons and SIM card slot
    • Turn on/off your IdeaTab
    • Activating/deactivating display
    • Screen Lock/unlock
    • Navigation tips
    • Home screen
    • Switching home screen
    • Status bar
    • Recent apps
    • Applications managemen t
    • Entering text

    For owners of Lenovo IdeaTab A2107 here we give you direct link download of Lenovo IdeaTab A2107 user manual guide from official Lenovo website below:

    Download Lenovo IdeaTab A2107 user manual guide here.

    Cara Hard Reset OPPO Find 5

    Cara Hard Reset OPPO Find 5.


    Posting kali ini akan saya tuliskan tentang bagaimana cara melakukan Hard Reset pada smartphone OPPO Find 5, seperti kebanyakan problem yang terjadi pada smartphone, tentang alasan kenapa kita harus melakukan Hard Reset pada OPPO Find 5. Misalkan terjadi Bootloop sehingga Smartphone Android OPPO Find 5 anda tidak dapat di hidupkan, atau mungkin lupa terhadap PIN atau Pattern Lock, dan berbagai masalah lainya yang timbul, sehingga kita harus terpaksa melakukan Hard Reset pada Android OPPO Find 5 tersebut.

    Keuntungan dan Spesifikasi utama dari OPPO Find 5 :


    1. LCD FULL HD IPS 1080 x 1920 piksel, 5,0 inci dengan Gorilla Glass 2
    2. Prosesor Quad-core 1.5 GHz Krait
    3. GPU Adreno 320
    4. Memori internal 16 atau 32 GB
    5. RAM 2 GB RAM
    6. Kamera Utama 13 MP (beberapa contry memiliki kamera 8MP) autofocus, LED flash
    7. Depan Ka mera 1.9 MP
    8. Sistem Operasi Android OS, v4.1 (Jelly Bean)
    9. Baterai Li-Po 2500 mAh

    Cara Hard Reset OPPO Find 5
    Cara Hard Reset OPPO Find 5

    Cara Hard Reset OPPO Find 5.


    Sebelum melakukan Hard Reset, apakah anda mengetahui apa itu Hard Reset ? Hard Reset adalah pengembalian sistem Android ke pengaturan awal pabrikan yang mana semua yang ada di Smartphone Android akan kembali seperti baru lagi, termasuk aplikasi, pengaturan, tampilan dan sistem itu sendiri. Tetapi untuk versi OS Firmware tidak kembali ke versi dimana Android itu pertama kali dibeli tetapi kembali ke terakhir kali versi OS Firmaware itu diupdate. Fitur hard reset itu sendiri akan menghapus semua yang ada di Smartphone Android kita kecuali aplikasi bawaan pabrikan dan pengaturan bawaan pabrikan.

    Bagaimana dengan Aplikasi yang anda download, foto, video, atau lagu-lagu ? Kesemuanya itu tidak akan terhapus jika anda menyimpannya di memori eksternal, misal SD Card. Sebaliknya jika kita menyimpannya di memori internal pasti akan terhapus, kecuali gambar bawaan dari Smartphone Android sendiri.

    Jika Anda berminat melakukan hard reset, saran yang utama dalah lakukan backup terlebih dahulu data-data penting anda yang tersimpan di dalam Smartphone Android.

    Baik.. Jika anda sudah memahami istilah Hard Reset pada Smartphone Android, dan sudah paham apa yang menjadi resikonya. Mari sekarang kita lanjutkan langkah dalam melakukan Hard Reset pada Smartphone Android OPPO Find 5 :


    Langkah-langkah (metode 1)

    Jika kita tidak dapat mas uk ke menu, atau OPPO FIND 5 tidak bisa menyala atau hang atau macet atau freeze sehingga kita tidak dapat mengakses pengaturan menu atau tidak terjadi saat sentuh layar, kemudian mencoba untuk pabrik reset dengan tombol rahasia dan kunci hardware

    1. Matikan Smartphone OPPO Find 5
      Cara Hard Reset OPPO Find 5
      Cara Hard Reset OPPO Find 5


    2. Kemudian Tekan dan tahan bersamaan Tombol Volume Down+ tombol Power,
    3. Setelah muncul menu Recovery di layar, lepaskan tombol
    4. Kemudian muncul menu seperti gambar dibawah ini.
      Cara Hard Reset OPPO Find 5
      Cara Hard Reset OPPO Find 5
    5. Pilih English
    6. Selanjutnya akan muncul menu oppo recovery seperti gambar dibawah ini.
      Cara Hard Reset OPPO Find 5
      Cara Hard Reset OPPO Find 5
    7. Selanjutnya pilihlah menu "wipe data and cache" -> gunakan tombol volume untuk memilih-milih menu, dan tombol power untuk eksekusi pilihan.
      Cara Hard Reset OPPO Joy R1001
      Cara Hard Reset OPPO Find 5
    8. Sekarang pilihlah "yes" menggunakan tombol volume down dan eksekusilah menggunakan tombol power.
      Cara Hard Reset OPPO Find 5
      Cara Hard Reset OPPO Find 5
    9. Proses Wipe akan berjalan, Setelah itu tekan tombol power, untuk konfirmasi menu pilihlah tombol reboot.

    Langkah-langkah (metode 2)

    Hard Reset OPPO Find 5 dengan menu software

    • Nyalakan OPPO Find 5
    • Pastikan baterai tidak kosong
    • Backup data penting di OPPO Find 5 karena semua data dan aplikasi akan menghapus atau menghapus
    • Masuk ke Menu: Pengaturan
    • Pilih Tab: General
    • Tekan Backup & Reset> Kembalikan pengaturan pabrik
    • Lebih baik Anda tidak memeriksa apa-apa di pilihan jika Anda tidak ingin menghapus data pada partisi data pada memori internal
    • Pilih Reset telepon
    • OPPO Find 5 akan melakukan proses master reset.

    Silahkan anda praktekan Cara Hard Reset OPPO Find 5 diatas, semoga berhasil.


    PERHATIAN... !!!
    Hard Reset akan menghapus semua data dan akun
    Penulis tidak bertanggung jawab pada resiko yang ditimbulkan sesudahnya.

    Compare HTC Windows Phone 8X vs Nokia Lumia 820

    Compare HTC Windows Phone 8X vs Nokia Lumia 820 - For business performance, the two smartphones have equivalent performance. Both are powered by the Qualcomm MSM8960 Snapdragon chip with support for dual-core 1.5GHz processor and GPU Adreno 225 Krait. Both come equipped with 1GB of RAM.

    Nokia Lumia 820 and HTC Windows Phone 8X both have a touch screen with the same size of 4.3 inches. But for the quality of the screen HTC Windows Phone 8X better, as this smartphone uses S-LCD2 display with a resolution of 720 x 1280 pixels (342ppi) and coated with Corning Gorilla Glass 2. While the Nokia Lumia 820 uses AMOLED screen with a resolution of 480 x 800 pixels (217ppi) and comes with Nokia ClearBlack technology.
    Nokia Lumia 820 vs    HTC Windows Phone 8X

    Nokia Lumia 820 and HTC Windows Phone 8X both equipped with an 8 megapixel camera. But for the quality of the photo, Lumia 820 camera seems more promising, because this smartphone uses Carl Zeiss Tessar lens. Both are also equipped with a front camera.

    HTC Windows Phone 8X internal memory capacity of 16GB which is larger, but unfortunately this smartphone does not have an external memory slot. The Nokia Lumia 820 only has an internal memory capacity of 8GB, and the smartphone is also equipped with a microSD slot up to 64GB.

    For connectivity features both equipped with features such as 3G network support HSDPA / HSUPA, Wi-Fi a / b / g / n, Bluetooth 3.1, GPS, microUSB port, NFC, and even 4G LTE network (4G service is unfortunately not yet can be enjoyed in Indonesia). Both use a micro SIM.

    And for power, the Nokia Lumia 820 is equipped with a battery capacity of 1650mAh, and HTC Windows Phone 8X comes with a battery capacity of 1800mAh.

    Both devices offer the same performance. For those of you who like to look good screen lebik can choose HTC Windows Phone 8X, and for those of you who want a smartphone with a better quality camera can choose Nokia Lumia 820.

    Nokia Lumia 820
    Nokia Lumia 820

    Nokia Lumia 820 is a Windows Phone 8 smartphone that comes with a screen measuring 4.3-inch AMOLED touchscreen with a resolution of 800 x 480 pixels. Nokia Lumia 820 is powered by a dual-core Snapdragon S4 processor 1.5GHz, Adreno 225 GPU and 1GB of RAM.

    Nokia Lumia 820 is equipped with an 8 megapixel camera with Carl Zeiss optics, 8GB internal memory, NFC, HSDPA and HSUPA, Wi-Fi, Bluetooth, GPS, microSD slot up to 32GB, and battery capacity of 1650mAh. Nokia Lumia 820 is also equipped with a wireless charging support (without cables).

    HT C Windows Phone 8X
    HTC Windows Phone 8X

    HTC Windows Phone 8X present using WIndows Phone 8 OS with support for dual-core processor 1.5GHz Snapdragon S4 Krait, and comes with Adreno 225 GPU and 1GB of RAM. HTC Windows Phone 8X using the touch screen Super sized 4.3-inch LCD 2 with 720p resolution and is coated with Corning Gorilla Glass 2.

    HTC Windows Phone 8X comes with an 8 megapixel camera that uses HTC ImageChip, where the smartphones camera is capable of recording 1080p HD video with stereo sound. HTC Windows Phone 8X also equipped with 2.1 megapixel front camera, 16GB o f internal memory plus a microSD slot, Wi-Fi a / b / g / n, Bluetooth, GPS, NFC, 1800mAh battery, and Beats Audio.

    Compare Samsung Galaxy Y Duos vs Acer Z110


    Samsung Galaxy Y Duos vs Acer Z110 - Acer Z110 and Samsung Galaxy Y Duos are both present but using different versions of the Android OS. Acer Android 4.0 ICS Z110 uses a newer, while the Samsung Galaxy Y Duos still using Android 2.3 Gingerbread.

    For business performance, Acer Z110 is powered by a single core 1GHz processor and 512MB of RAM. While the Samsung Galaxy Y Duos ditenagi with single-core 832MHz processor and 290MB of RAM. Acer Z110 also has an internal memory capacity of a much larger that 4GB, while the Samsung Galaxy Y duos only has 160MB of internal memory capacity.
    Acer Z110 has a size large r touch screen that measures 3.5 inches with a resolution of 320 x 480 pixels (165ppi). While the Samsung Galaxy Y Duos has a 3:14-inch touchscreen with a resolution of 240 x 320 pixels (127ppi).

    Acer Z110 and Samsung Galaxy Y Duos are both equipped with a 3 megapixel camera. And they are not equipped with a front camera.

    For connectivity features, these two smartphones equipped with 3G HSDPA, WiFi, Bluetooth, GPS, and microUSB port.

    I prefer Acer Z110, in addition to having a cheaper price tag, Acer Android version Z110 offers a newer, faster performance, larger screen, and a larger internal memory.

    Acer Z110
    Acer Z110 is a smartphone Android 4.0 ICS that comes with touch screen measuring 3.5-inch 320 x 480 pixels. Acer Z110 is powered by a 1GHz processor.

    Acer Z110 comes with 4GB of internal memory plus a microSD slot, 512MB RAM, 3 megapixel camera, WiFi, GPS, Bluetooth, and 3G support HSDPA / HSUPA.

    Samsung Galaxy Y Duos
    Samsung Galaxy Y Duos is an Android smartphone to support dual GSM + GSM. Samsung Galaxy Y Duos present uses Android 2.3 Gingerbread with 830MHz processor support.

    Samsung Galaxy Y Duos comes with other features such as a touch screen measuring 14.3 inches with a resolution of 240 x 320 pixels, 512MB ROM, 384MB RAM, 3 megapixel camera, HSDPA support, Wi-Fi 802.11 b / g / n, Bluetooth 3.0, GPS, microSD slot up to 32GB, and battery capacity of 1300mAh.

    Senin, 27 Juni 2016

    How to flash Huawei U8800 Stock ROM


    How to flash Huawei U8800 Stock ROM without any tools


    Method 1:


    Step 1: Download stock ROM from below link.

    Step 2: Extract ROM on your PC or mobile. After extracting you will see UPDATE.APP  file.

    Step 3: Now, cre ate New folder on your Micro SD card, and rename it to dload.

    Step 4: Now, Move UPDATE.APP file to dload folder.

    Step 5: Now, power OFF your phone.

    Step 6: Now press Power key + Volume down + volume up for 5-10 seconds.


    Step 7: Now you will see update process on your phone like below image.


    Step 8: Once update process completed, your phone will automatically restart.


    Method 2:


    Step 1: Download stock ROM from below link.

    Step 2: Extract ROM on your PC or mobile. After extracting you will see UPDATE.APP  file.

    Step 3: Now, create New folder on your Micro SD card, and rename it to dload.

    Step 4: Now, Move UPDATE.APP file to dload folder.

    < Step 5: Now, navigate to Settings > Updates > System Updates> Local Update


    Step 6:  Now, read all the warning and tap CONFIRM to start update process.

    Step 7:   Once update process completed, your phone will automatically restart.


    < DOWNLOAD:


    Guide to Install CWM and TWRP Recovery on Android Smartphone Without PC

    Guide to Install CWM and TWRP Recovery on Android Smartphone Without PC.

    Install CWM and TWRP Recovery. On this guide we will learn together how to install a recovery on any android device. You can find a lot of custom recoveries available and ready to install on android device, but today most popular recovery are ClockworkMod Recovery (also called CWM) and TWRP (TeamWin Recovery Project). There are three methode you can use as a standart methodes to install custom recovery on your Android smartphone devices. First, we can use ROM Manager or GooManager. second, we can use Fastboot. third, using flash image. You can decide which the easiest method to install custom recovery on your device.


    Before we go to t he next step, we must know what is the different of CWM and TWRP recovery. So, you can easy to decide what recovery should be used when you want to flash or install ROM on your device. CWM or ClockworkMod Recovery has been developed by Koushik Dutta (Koush), By using CWM recovery you will be able to perform several advanced recovery, installation, maintanance system, backup and restoration on your Android device which this is not possible you did on the stock recovery. And sometimes its most common method used to gain root access to your android system, install custom ROMs, Install new kernel, install themes and mods.

    And now, what is TWRP (TeamWin Recovery Project) definitions ? This recovery is a fully touch-based custom recovery that was initially developed for Nexus devices, But now TWRP recovery has been made avail able for countless other android smartphones and tablets as well, and its avaliable in official or third party.

    On this guide We will show to you step by step guide to install CWM and TWRP Recovery on Android Smartphone Without PC. You can follow guide below to install it on your Android device.

    Guide to Install CWM and TWRP Recovery.

    1. Your android device should on WiFi area coverage.
    2. Make sure your android device has been rooted.
    3. You must download and install ROM Manager Apps

      • For free use download here

      • For premium use download here
    4. Then open this App, on main screen you will see recovery setup.
      Install CWM and TWRP Recovery
      Install CWM and TWRP Recovery
    5. Under Install update recovery, you can select which custom recovery want to be installed on android device. There are two option on it.
      • ClockworkMod Recovery (CWM)
      • Team Win Recovery Project (TWRP).
    6. When you finished select the custom recovery, now confirm your phone model
      confirm your phone model.
      confirm your phone model.
    7. Here is list of device supported by this apps is : 

      • Huawei
        • Huawei Pulse Mini
        • Huawei Pulse 
        • Huawei Ascend
        • Huawei U8220/U8230
        • Huawei Ascend 2 (M865)
      • Dell
        • Dell Streak
      • Commtiva
        • Commtiva Z71 (Boston, Blaze, and more)
        • Commtiva Link N700, 
        • Commtiva Spice MI700
      • Geeksphone
        • Geeksp hone ONE
      • Micromax
        • Micromax A70
      • Samsung
        • Samsung Galaxy S2 (T-Mobile)
        • Samsung Galaxy Tab 8.9 (AT&T)
        • Samsung Galaxy S Blaze 4G
      • LG
        • LG Connect 4G MS840
        • LG Lucid VS840
        • LG Spectrum 4G
        • LG Revolution 4G
        • LG Esteeem 4G
        • LG Optimus M+
    8. If your device not listed above, you should abort this task.
    9. After you confirm phone model, now confirm version of your custom recovery
      • ClockworkMod 2.x
      • ClockworkMod 3.x+
    10. Then download your custom recovery
    11. When finish you must reboot your android device.

    12. If you successfully installed custom recovery, you will see recovery already installed on your android system.
      Install CWM and TWRP Recovery
      Install CWM and TWRP Recovery 
    13. Finish, your android device is installed custom recovery now.

    How to Transfer Data Contacts from Android to LG G5


    If you plan to switch from Android to LG G5, you may want to transfer Android Data contacts to LG G5. Android Contacts Transfer is the best tool to help you transfer data from Android Samsung/LG/HTC/Sony/Huawei/Moto to LG G5 directly on computer. All your contacts will be copied and merged perfectly on your LG G5. Convenient and safe.

    Mobile Transfer is an easy-to-use phone to phone transfer software for Android, Android and LG users to transfer contacts, photos, music, videos, messages, call history, apps and more b etween two phones, e.g. transferring Contacts from android to LG G5, transferring apps from old Android to new LG, transferring music from iPhone to Android, etc. with only 1 click.


    Easy use guide to transfer data contacts from android to LG G5:


    Step 1. Run the Transfer Tool

    Launch Mobile Transfer on your computer after its installed. When you get the primary window as below, please select the Phone to Phone Transfer mode.


    Step 2. Connect Both Android Devices to PC

    Connect both your old android and new LG G5 phones to the computer via their USB cables respectively. Once the software recognizes both devices, they will be displayed on the window with one being the Source and the other, the Destination.
    Note: The "Flip" button is used to switch two phones places when necessary.


    Step 3. Transfer contacts from Android to LG G5

    You cant miss the middle column where you can choose data to copy. Please check "contacts" and click "Start Copy". When the contacts transferring is done, please click OK.


    ----------------------------------------------------------------------------------------------------------------------------------


    More related articles

    How to Transfer Contacts from Samsung Galaxy S3/S4/S5 to iPhone 5SE

    How to Transfer iPhone Contacts to Samsung S7 (Edge)

    How to Transfer Data Between Samsung Galaxy And LG G4 Pro

    How to Transfer Data Contacts from Samsung to LG V10?

    HTC Evo 4G LTE user manual for Sprint


    HTC Evo 4G LTE user manual for Sprint â€" HTC Evo 4G LTE was released on May 2012 exclusive for Sprint Nextel carrier. HTC Evo 4G LTE released by the Taiwanese manufacturer as a successor of the old Evo series, HTC Evo 4G and HTC Evo 3D. With good appearance and smart features, HTC Evo 4G LTE is the first LTE enabled smartphone for Sprint will make Sprint subscribers will enjoy the smartphone.


    HTC Evo 4G LTE user manual for Sprint


    HTC Evo 4G LTE for Sprint Nextel equipped with specifications and key features such as: 134.8 x 68.9 x 8.9 mm in dimension with 134 g in weight, 4.7 inch Super IPS LCD 2 capacitive touchscreen display 16 million colors 720 x 1280 pixels plus Corning Gorilla Glass protection and HTC Sense UI 4, microSD up to 32 GB, 16 GB of storage, 1 GB of RAM, 8 megapixel rear facing camera with autofocus and LED flash, 1.3 megapixel front facing camera, Android 4.0.3 Ice Cream Sandwich operating system, powered by 1.5 GHz dual core MSM8960 Snapdragon Adreno 225, Li-Ion 200 mAH battery, stand-by time up to hours and talk time up to 7 hours.

    < span style="font-family: Arial, sans-serif; font-size: 9pt; font-weight: normal;">HTC Evo 4G LTE user manual for Sprint is available to download in pdf format which will helps Sprint users on safety to use the smartphone. The user manual guide of HTC Evo 4G LTE contains of 208 pages with 3.32 MB of size. On HTC Evo 4G LTE user manual you will find setting up of some apps such as: Sprint TV & Movie and Nascar Sprint Cup Mobile.

    Table of contents for HTC Evo 4G LTE user manual for Sprint:

    • Get started
    • Phone basics
    • Phone calls
    • Settings
    • People
    • Accounts and messaging
    • Applications and entertainment
    • Web and data
    • Camera and video
    • Tools and calendar
    • Calculator
    • Clock and a larm
    • Stocks
    • Weather
    • Tasks
    • Online storage
    • HTC Sync Manager
    • Voice recorder
    • Bluetooth and NFC
    • MicroSD card
    • Upd ate your phone
    • Index

    For owners of HTC Evo 4G LTE, here we give you direct link download of HTC Evo 4G LTE user manual for Sprint from official of HTC website below:

    Download HTC Evo 4G LTE user manual for Sprint here 


    Minggu, 26 Juni 2016

    Android Tablet Data Recovery How to Recover Deleted Files from Android Tablet

    Tablet is a great tool to take photos, watch videos, listen musics, and capture amazing moments, it become a necessary device in our daily life. More and more people are tend to use android tablet due to the open-source nature of Google’s Android OS. In the meantime, more and more android tablet users encountered data loss and came to us for help. That’s why we post this article to solve this issue, read on to get the detailed way to recover deleted files from Android tablets.

    Before we get started, I’d like to introduce a powerful android tablet data recovery tool named Jihosoft Android Data Recovery(Android Recovery Mac). This program is the key to restore data from Android tablet, with it, you can easily get back deleted/lost files on android internal memory as well as external sd card of your tablet.


    About Android Tablet Recovery:

    Supported Android Tablets: Samsung tablets like Samsung Galaxy Note 10.1, Galaxy Tab2 10.1, Galaxy Tab2 7.0, Galaxy Tab Plus, Galaxy Tab 7.7, Galaxy Tab 7.0 Plus. Galaxy Tab Pro, Galaxy Tab S, Galaxy Tab A, Galaxy Tab S2, Galaxy Tab 4 Galaxy Note, etc. Nexus 10, Google Nexus 9, Nvidia Shield Tablet, Sony-Xperia-Tablet etc.

    Supported File Types:
    photos, videos, contacts, important messages (like viber messages, WhatsApp chat history, attachments) documents, etc.

    Supported Android OS: Android 5.0 Lollipop, Android 4.4 KitKat, Android 4.1/4.2/4.3 Jelly Bean, Android 4.0 Ice Cream Sandwich and Android 3.0/3.1/3.2 etc.

    How to Use Android Tablet Recovery Program to Recover Data


    Ste p 1. Turn off Wifi/3G connection and stop use your tablet. This step is very important, as deleted/lost data on android tablet probably overwritten by new content.
    Step 2. Plug your android tablet to computer. Keep the tablet connected with your computer(mac) until the recovery process done.
    Step 3. Select specified file types you need to recover. Select Multimedia option to recover photos, videos, audio files and other documents. Choose “Database” to retrieve messages, contacts, “Whatsapp” to recover whatsapp messages and whatsapp attachments. Or you can simply click “All” to scan all data on your tablet.
    Step 4. Access and scan data on Android tablet. If you need to recover data from android tablet memory, you have to root your android device at first. Or you can simply enable USB debugging to let this program access to your tablet.
    Step 5. Preview and recover data from android tablet selectively. All recovera ble data found will be displayed on the scanning result. Click them one by one to preview, and mark the files you need to restore, then tap “Recover” button. That’s it, you can export the files to your computer/mac in the original quality.